
I think we are almost ready to start decorating the interior of our 1973 Shasta travel trailer.
We have to replace a portion of our paneling in out ceiling. Most vintage travel trailer have issues with areas that leak. The areas that are most vulnerable are the corners, around the trailer windows, and the roof vents, our 1973 Shasta travel trailer is no exception.
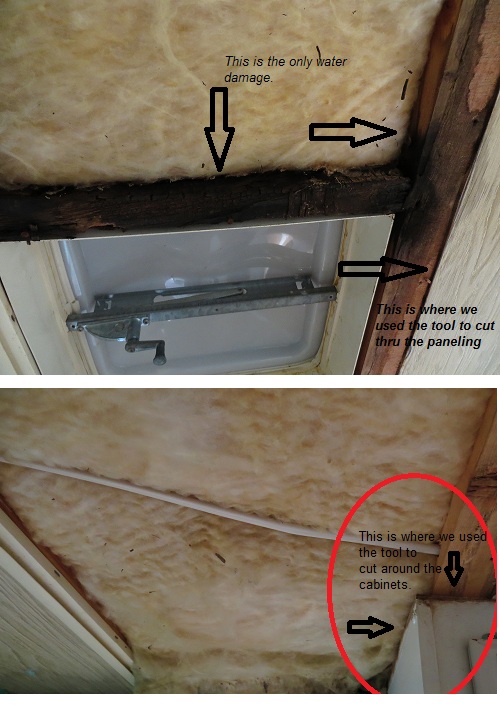
If you have read my previous post, you have seen that we addressed water damage in the front and rear corners. I think we were lucky because damage was minimal. Now we are addressing the damage near the ceiling vent. Again we are lucky as the damage is minimal.

Unfortunately this is the only picture I have of the damaged paneling. I forgot to take pictures again. I just happened to notice that if you look in the refection of the mirror you can see it. The damaged paneling really wasn't all that bad, but I have seen what can lurk behind damaged paneling, so this was not an issue to be ignored.
The biggest issue we had was removing the paneling. This particular piece of paneling just happened to run under two cabinets and the closet. (You can see one cabinet in the picture and the other is in the reflection.) We THOUGHT this would be a fairly easy process. All we would have to do is unscrew the cabinets and then start ripping out the paneling. Until...we discovered that not only where the cabinets screwed in, they were nailed in as well. The nails could not be accessed be cause they were nailed to the frame before the skin (siding) of the trailer was put on.
Not knowing what the heck to do, I turned to my wonderful friends on the Vintage Shasta Proboards, and they helped me solve this little riddle. We ended up buying a little Oscillating Multifunction Power Tool. It is only $24.99 from Harbor Freight, but we had a coupon and got ours for only $17.99. This is an awesome tool and saved us hours of hard work.

Instead of removing the cabinet, the oscillating tool allowed us to cut out the paneling where we needed to. What we did was take an angle square and drew a straight line from one side to the other. The oscillating tool allowed us to cut down the line through the paneling. This gave us a nice straight edge to work with when we were ready to cut out a new piece of paneling. We then used the tool to cut the paneling around the cabinet and closet. I was amazed at how close this tool allowed us to get. Luckily there was no indication of wood rot anywhere else in the ceiling. Once we get the paneling in place we will be ready to start the finishing work. OMG, I need to pick out a paint color!

We have to replace a portion of our paneling in out ceiling. Most vintage travel trailer have issues with areas that leak. The areas that are most vulnerable are the corners, around the trailer windows, and the roof vents, our 1973 Shasta travel trailer is no exception.
If you have read my previous post, you have seen that we addressed water damage in the front and rear corners. I think we were lucky because damage was minimal. Now we are addressing the damage near the ceiling vent. Again we are lucky as the damage is minimal.

Unfortunately this is the only picture I have of the damaged paneling. I forgot to take pictures again. I just happened to notice that if you look in the refection of the mirror you can see it. The damaged paneling really wasn't all that bad, but I have seen what can lurk behind damaged paneling, so this was not an issue to be ignored.
The biggest issue we had was removing the paneling. This particular piece of paneling just happened to run under two cabinets and the closet. (You can see one cabinet in the picture and the other is in the reflection.) We THOUGHT this would be a fairly easy process. All we would have to do is unscrew the cabinets and then start ripping out the paneling. Until...we discovered that not only where the cabinets screwed in, they were nailed in as well. The nails could not be accessed be cause they were nailed to the frame before the skin (siding) of the trailer was put on.
Not knowing what the heck to do, I turned to my wonderful friends on the Vintage Shasta Proboards, and they helped me solve this little riddle. We ended up buying a little Oscillating Multifunction Power Tool. It is only $24.99 from Harbor Freight, but we had a coupon and got ours for only $17.99. This is an awesome tool and saved us hours of hard work.

Instead of removing the cabinet, the oscillating tool allowed us to cut out the paneling where we needed to. What we did was take an angle square and drew a straight line from one side to the other. The oscillating tool allowed us to cut down the line through the paneling. This gave us a nice straight edge to work with when we were ready to cut out a new piece of paneling. We then used the tool to cut the paneling around the cabinet and closet. I was amazed at how close this tool allowed us to get. Luckily there was no indication of wood rot anywhere else in the ceiling. Once we get the paneling in place we will be ready to start the finishing work. OMG, I need to pick out a paint color!
No comments:
Post a Comment